Processing an Azure Alert with a Logic App
April 13, 2020 3 Comments
This is part 3 in the scenario Perform Automation Based on Device Enrollment in Microsoft Intune.
This post describes how to take the Logic App webhook configured in Create a Webhook from Azure Alerts to a Logic App process and prepare the data to be sent to ServiceNow, as described in our scenario. For this post, we’ll just send information to an email (which many people have asked for already). We’ll save the process of sending the device information to ServiceNow for our next post.

For this post, we focus on processing the data once it’s received in the webhook. Some of the receive data is a little complicated to process directly in Logic Apps, so it’s worth the effort to build an Azure Function to quickly process the desired data using PowerShell.
And that’s the high-level description. Now let’s get into the details for HOW to make this happen.
Prerequisites
To perform the steps in this post, complete all the steps and prerequisites in part 2, Create a Webhook from Azure Alerts to a Logic App.
Enroll a Device to Generate Test Data
You completed all the steps in part 2 to get the data into your Logic App, so go ahead and enroll a device in Intune to generate data we can use for testing.
- Perform the steps to Test Diagnostics Sent to Log Analytics from our previous post.
- After verifying the test in the previous step, navigate to Alerts in the Azure portal.
You may need to wait at the Alerts page here for FIVE minutes, as our alert rule runs on a five-minute interval.
- Click on Sev 4 (because that’s what we defined in the previous step), and you should see a “Fired” alert, as shown in Figure 2.

- Click on the alert named New Device Enrolled to view the details. Select the History tab to verify the action group was triggered, as shown in Figure 3.

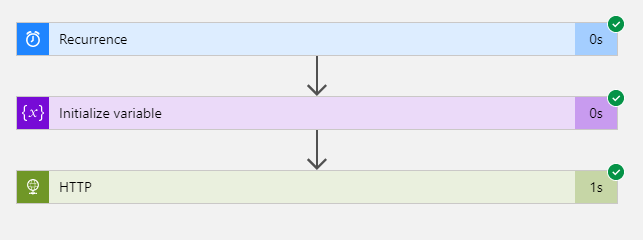
- Now that you’ve verified the action group was successfully triggered, view the Runs history on the Logic App (we named it DeviceEnrollment), as shown in Figure 4.

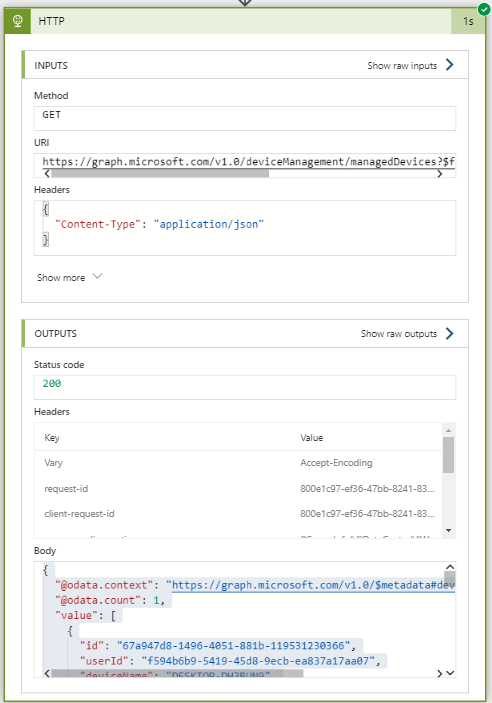
- Click on the most recent run to view the details of the Logic app run. Click on When an HTTP request is received and observe OUTPUTS, as shown in Figure 5.

At this point you have verified that enrollment data was successfully sent to the Logic App, and you’re ready to start enhancing the Logic App.
Processing Data with the Logic App
And finally, we can start processing data! Please note that since you successfully have the webhook receiving device enrollment data, the process of iteratively developing and testing is easy! As you can see in Figure 5, there is a Resubmit button, so you’re able to make changes to (and save) the Logic App and then Resubmit the previous test payload, so you don’t have to actually enroll a device each time.
At this time, hopefully, you’re still on the same page shown in Figure 6, where you can view the output of our enrollment test run-this is where we start this stretch of development.
Add Schema to the HTTP Processing Step
- Click on Show raw outputs to view the body of the webhook sent from Azure alerts, as shown in Figure 6.

- Edit the DeviceEnrollment Logic App, and expand the first (and only) step When a HTTP request is received.
- Click Use sample payload to generate schema, paste the sample alert schema from this page, and click Done. You should now see the Request Body JSON Schema as shown in Figure 7.

- Click Save.
Create an Azure Function App to Process the JSON payload (Using PowerShell)
Unfortunately, the alert information is nested in a way that it’s not easy to extract the data (well, currently for me, it’s pretty much impossible to extract using only Logic Apps-let me know if you figure out how to do this with less pain). However, we can quickly extract the data using PowerShell in an Azure Function App. For reference, here’s sample input to the Azure Function App, and here’s the resulting output.
Special shout-out to @donnie_taylor for schooling me on pushing this data through an Azure Function App. We tried a lot of “Parse JSON” attempts in Logic Apps directly, and just couldn’t get the alerts appropriately parsed.
- From the Azure portal, create a new Function App.
- Select the Resource Group (the same group as the Logic App), name it something unique (I chose ParseDeviceEnrollHook, so that one isn’t available to you), and choose PowerShell Core for the runtime stack as shown in Figure 8.

- Click Review & Create, then Create.
- Once created, open the resource.
- Navigate to Functions and click New Function.
- Chose HTTP trigger.
- Name the function HTTPTrigger and set the Authorization level to Anonymous as shown in Figure 9.

- Click Create to view the code.
- Paste the PowerShell code below into the Function App (overwrite all code in the window). Alternatively, you can grab the code from here.
using namespace System.Net

# Input bindings are passed in via param block.
param($Request, $TriggerMetadata)

# Write to the Azure Functions log stream.
Write-Host "PowerShell HTTP trigger function processed a request."

# Interact with query parameters or the body of the request.

#Take the  information from Azure Common Alert Schema for Log Analytics,
# and get the query results into a format we can actually use
$columns = $Request.body.data.alertContext.SearchResults.tables.columns.name
$rows = $Request.body.data.alertContext.SearchResults.tables.rows

#Set name-value pairs for each Search Result
$arr = @()

if ($Request.body.data.alertContext.ResultCount -eq 1) {
    $hash = @{}

    for ($i = 0; $i -lt $columns.count; $i++)
    {
        $hash.Add($columns[$i],$rows[$i])
    }
    $arr += $hash
}


else {
$rows | foreach {
$hash = @{}

for ($i = 0; $i -lt $columns.count; $i++)
    {
        $hash.Add($columns[$i],$_[$i])
    }
        $arr += $hash
    }
}

#Ensure we have an array of the results, and convert to JSON
$arrResults = ConvertTo-Json @($arr) -Compress

if ($arrResults) {
    $status = [HttpStatusCode]::OK
    $body = $arrResults
}
else {
    $status = [HttpStatusCode]::BadRequest
    $body = "No Data."
}

# Associate values to output bindings by calling 'Push-OutputBinding'.
Push-OutputBinding -Name Response -Value ([HttpResponseContext]@{
    StatusCode = $status
    Body = $body
})
- Save the Function App.
Call the Azure Function App from Logic Apps
At this point we’ve received a payload to our Logic App, and we’re ready to send it to the Azure Function App for processing.
- Open the DeviceEnrollment Logic App.
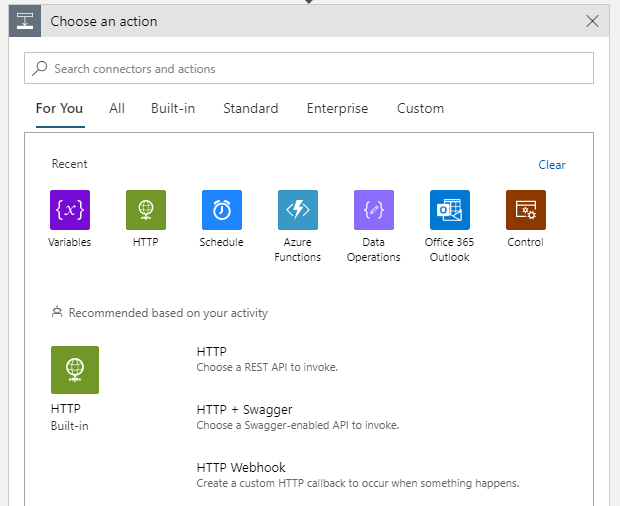
- Add a new action, and choose Azure Functions.
- Choose the Azure Function App you just created, called ParseDeviceEnrollHook. Continue by selecting the HTTPTrigger from the Actions tab, as shown in Figure 10.

Choose Body (the one that start with a capital “B“)as the request body for Http Trigger. Notice as you mouse over Body, you see the detail triggerBody(). Set the Headers as shown in Figure 11.

Parse the JSON results from ParseDeviceEnrollHook
When the ParseDeviceEnrollHook Azure Function App runs, the resulting payload will contain an array of all devices sent from the query results from the Azure Alert trigger created in my previous post. View a sample payload here. The next step is to parse that data so we can process each alert.
- Add a new action, choose Data Operations and then Parse JSON.
- For Content, choose the Body of the ParseDeviceEnrollHook step.
- Paste the following JSON for the Schema field (note, this is the schema, and not a sample payload):
{
    "items": {
        "properties": {
            "Category": {
                "type": "string"
            },
            "OperationName": {
                "type": "string"
            },
            "Properties": {
                "type": "string"
            },
            "Result": {
                "type": "string"
            },
            "SourceSystem": {
                "type": "string"
            },
            "TenantId": {
                "type": "string"
            },
            "TimeGenerated": {
                "type": "string"
            },
            "Type": {
                "type": "string"
            }
        },
        "required": [
            "TimeGenerated",
            "OperationName",
            "Type",
            "TenantId",
            "Properties",
            "SourceSystem",
            "Result",
            "Category"
        ],
        "type": "object"
    },
    "type": "array"
}
- Verify the action with Figure 12.

Parse the Properties attribute for each record
Review the sample payload and you will see that each returned record has a Properties attribute that contains more JSON, so we need to parse that next.
- Add a new action, choose Data Operations and then Parse JSON.
- For Content, choose the Properties variable of the previous Parse JSON step.
- Note that as soon as you select the Properties variable, the Logic App Designer realizes this is an array (based on the schema from the Parse JSON step) and automatically creates a For each loop.
- Paste the following JSON for the Schema property:
{
    "properties": {
        "AadDeviceId": {
            "type": "string"
        },
        "AadTenantId": {
            "type": "string"
        },
        "AccountId": {
            "type": "string"
        },
        "ActivityId": {
            "type": "string"
        },
        "DeviceId": {
            "type": "string"
        },
        "EnrollmentEndTime": {
            "type": "string"
        },
        "EnrollmentStartTime": {
            "type": "string"
        },
        "EnrollmentType": {
            "type": "string"
        },
        "EnrollmentTypeMessage": {
            "type": "string"
        },
        "EventId": {
            "type": "string"
        },
        "IsAutopilot": {
            "type": "string"
        },
        "IsDuringEsp": {
            "type": "integer"
        },
        "RelatedActivityId": {
            "type": "string"
        },
        "Result": {
            "type": "string"
        },
        "ScaleUnit": {
            "type": "string"
        },
        "ScenarioName": {
            "type": "string"
        },
        "Scope": {
            "type": "string"
        },
        "StartTime": {
            "type": "string"
        },
        "Status": {
            "type": "string"
        },
        "TimeDiff": {
            "type": "string"
        },
        "Timestamp": {
            "type": "string"
        },
        "UserId": {
            "type": "string"
        },
        "UserUPN": {
            "type": "string"
        },
        "Version": {
            "type": "string"
        }
    },
    "type": "object"
}
This gets us to a single row in the returned results from our original Azure Monitor Alert action. Congrats, you finally have most of the data you need. Following shows example data from the previous Parse JSON step:
{
  "EnrollmentStartTime": "2020-04-11T05:23:38.3791076Z",
  "EnrollmentEndTime": "2020-04-11T05:23:40.2646604Z",
  "TimeDiff": "2",
  "Status": "Success",
  "UserId": "f594b6b9-5419-45d8-9ecb-ea837a17aa07",
  "DeviceId": "7e4be3df-4cfa-46ab-97ea-306437eead0c",
  "EventId": "46801",
  "Scope": "EnrollmentSuccess",
  "UserUPN": "greg@ramseyg.com",
  "EnrollmentType": "10",
  "EnrollmentTypeMessage": "AutoEnrollment",
  "IsAutopilot": "False",
  "AadDeviceId": "a7f65347-18ce-4575-9f28-6e75ba9e059f",
  "IsDuringEsp": 0,
  "Version": "10.0.18363.0",
  "AadTenantId": "8f0a670f-cf43-4ab7-xxxxxxxxxxxxxxx",
  "ScenarioName": "Microsoft.Management.Services.Diagnostics.SLAEvents.EnrollmentStatusPageSLAEvent",
  "ActivityId": "7e4be3df-4cfa-46ab-97ea-306437eead0c",
  "RelatedActivityId": "7f32e1da-5f1b-47ca-8334-bd2254bd43ef",
  "Result": "0",
  "Timestamp": "2020-04-11T05:23:40.2646604Z",
  "StartTime": "0001-01-01T00:00:00",
  "AccountId": "2713e776-be5c-4951-b487-xxxxxxxxxxxx",
  "ScaleUnit": "AMSUA0402"
}
In this JSON, you see information like AADDeviceID, IsAutopilot, etc. But for our scenario, we need additional information, such as Computer Name, Manufacturer, Model, and more. So our next step is to query that information from Intune, using Microsoft Graph.
Query Microsoft Graph to obtain Intune device properties
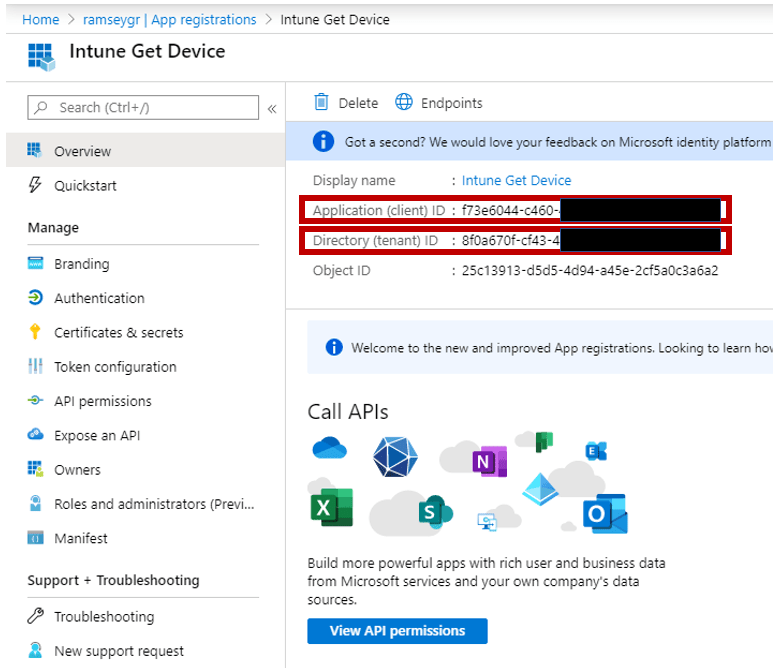
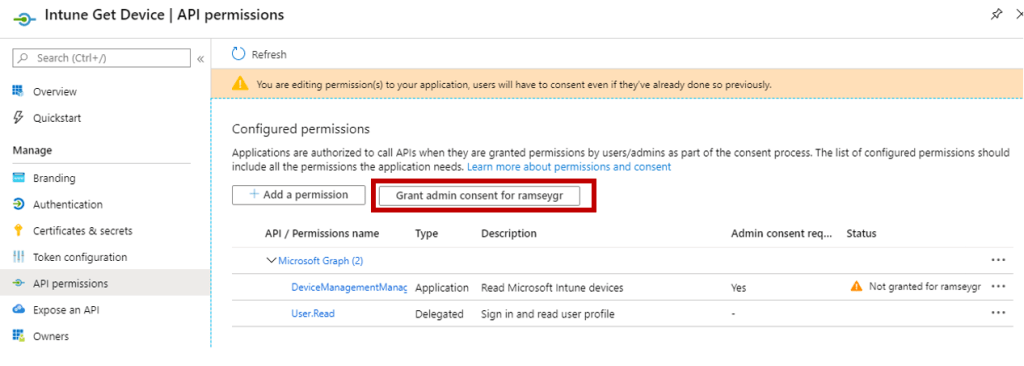
If you followed my previous blog on How to Use Logic Apps to Query Intune for Device Information, you have a head start for this step. If you have not, review that post to verify you have created the app registration and have the credentials required to query Graph for Intune.
- Add a new action, choose HTTP and then HTTP (again)..
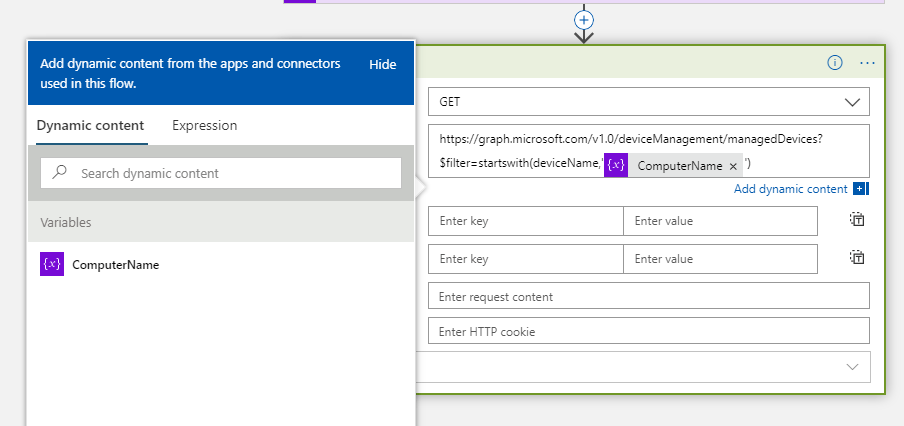
- Choose GET for the Method.
- For the URI, enter the following: https://graph.microsoft.com/v1.0/deviceManagement/managedDevices/. Next, insert your cursor at the end of the line and select DeviceID as shown in Figure 13.
- For Headers add “Content-Type” as “application/json” as shown in Figure 13.
- Click Add new parameter, select Authentication, and then click off of the dialog to add the Authentication Type to the step.
- Select Active Directory OAuth for the Authentication type.
- Add your Tenant, Client ID and Secret (the ones you copied earlier while creating the App registration).
- For Audience, enter https://graph.microsoft.com.
- Review settings and compare them to Figure 13.

Parse the results of GetManagedDevices
Congrats! You’re almost there!. Next we need to parse the graph query results from the previous step. Review the sample payload for the graph query and complete the following steps:
- Add a new action, choose Data Operations and then Parse JSON.
- For Content, choose the Body variable of the previous HTTP query step.
- Paste the following JSON for the Schema property:
{
    "properties": {
        "@@odata.context": {
            "type": "string"
        },
        "activationLockBypassCode": {},
        "androidSecurityPatchLevel": {},
        "azureADDeviceId": {
            "type": "string"
        },
        "azureADRegistered": {
            "type": "boolean"
        },
        "complianceGracePeriodExpirationDateTime": {
            "type": "string"
        },
        "complianceState": {
            "type": "string"
        },
        "configurationManagerClientEnabledFeatures": {},
        "deviceActionResults": {
            "type": "array"
        },
        "deviceCategoryDisplayName": {
            "type": "string"
        },
        "deviceEnrollmentType": {
            "type": "string"
        },
        "deviceHealthAttestationState": {},
        "deviceName": {
            "type": "string"
        },
        "deviceRegistrationState": {
            "type": "string"
        },
        "easActivated": {
            "type": "boolean"
        },
        "easActivationDateTime": {
            "type": "string"
        },
        "easDeviceId": {
            "type": "string"
        },
        "emailAddress": {
            "type": "string"
        },
        "enrolledDateTime": {
            "type": "string"
        },
        "exchangeAccessState": {
            "type": "string"
        },
        "exchangeAccessStateReason": {
            "type": "string"
        },
        "exchangeLastSuccessfulSyncDateTime": {
            "type": "string"
        },
        "freeStorageSpaceInBytes": {
            "type": "integer"
        },
        "id": {
            "type": "string"
        },
        "imei": {},
        "isEncrypted": {
            "type": "boolean"
        },
        "isSupervised": {
            "type": "boolean"
        },
        "jailBroken": {
            "type": "string"
        },
        "lastSyncDateTime": {
            "type": "string"
        },
        "managedDeviceName": {
            "type": "string"
        },
        "managedDeviceOwnerType": {
            "type": "string"
        },
        "managementAgent": {
            "type": "string"
        },
        "manufacturer": {
            "type": "string"
        },
        "meid": {},
        "model": {
            "type": "string"
        },
        "operatingSystem": {
            "type": "string"
        },
        "osVersion": {
            "type": "string"
        },
        "partnerReportedThreatState": {
            "type": "string"
        },
        "phoneNumber": {},
        "remoteAssistanceSessionErrorDetails": {
            "type": "string"
        },
        "remoteAssistanceSessionUrl": {
            "type": "string"
        },
        "serialNumber": {
            "type": "string"
        },
        "subscriberCarrier": {
            "type": "string"
        },
        "totalStorageSpaceInBytes": {
            "type": "integer"
        },
        "userDisplayName": {
            "type": "string"
        },
        "userId": {
            "type": "string"
        },
        "userPrincipalName": {
            "type": "string"
        },
        "wiFiMacAddress": {
            "type": "string"
        }
    },
    "type": "object"
}
Now that you have the device details in your Logic App, you’re UNSTOPPABLE!. To complete this post, we’ll simply send an email.
Send an email about device enrollment details
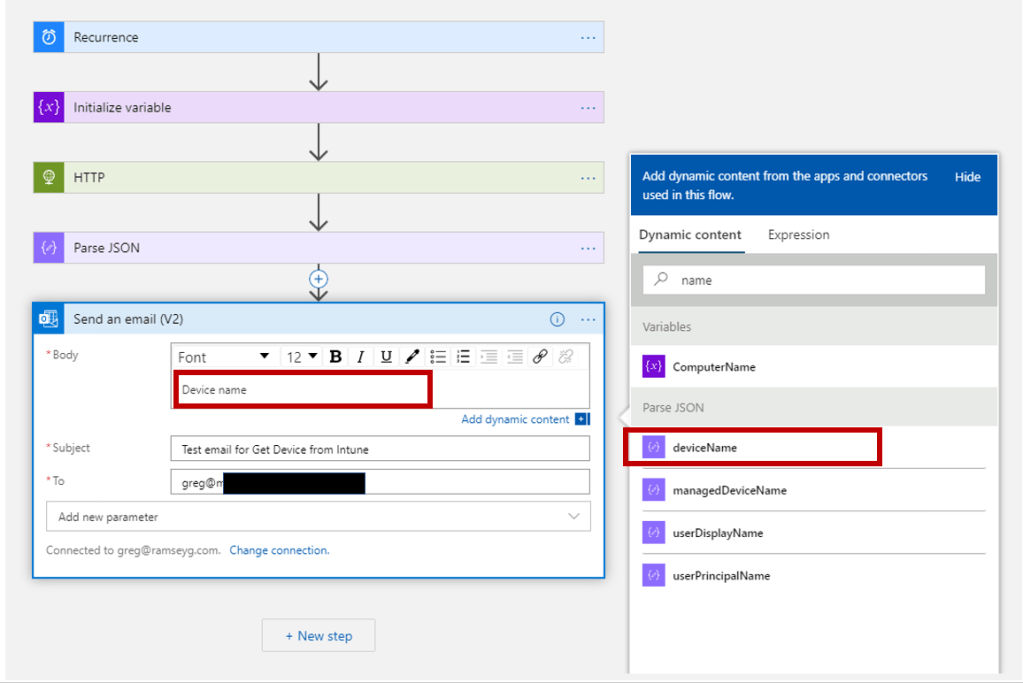
- Add a new action, choose Office 365 Outlook and then Send an email (V2).
- Complete your standard To and Subject lines, and feel free to add any of the properties from our previous Parse JSON step. For my example Logic App, I selected the following:
- deviceName
- managedDeviceOwnerType
- enrolledDateTime
- operatingSystem
- complianceState
- managementagent
- osVersion
- emailAddress
- azureADDeviceID
- model
- manufacturer
- serialNumber
- userDisplayName
- userPrincipalName
- Following my example, insert the dynamic property that matches each of the items above, as shown in Figure 14.

- Save your work, cross your fingers, and Resubmit one of your previous test runs, or enroll new devices to see your process in action! Remember that when you enroll a new device, it may take approximately 10 minutes for the information to flow from Log Analytics to Azure Monitor to your Logic App. If all goes well, you should receive an email similar to Figure 15.
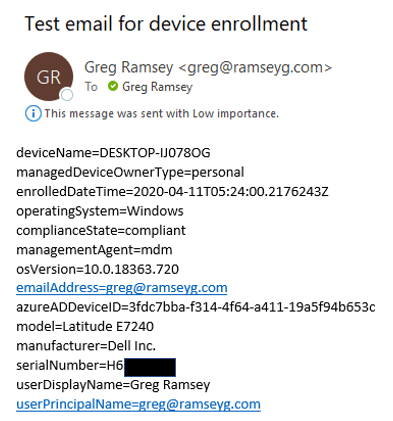
Figure 16 gives you an idea of what the Logic App should look like from start to finish:

Congrats! That was a long haul, but hopefully a great learning experience. I realize there are a lot of steps here, so you may need to walk through this a couple of times to work the kinks out. DeviceEnrollment_SendEmail – LogicApps Template-Sanitized.json is a sample template.
My next blog in this series will show how to use the Logic App to insert and update asset records in ServiceNow – stay tuned and happy automating!
Greg