How To: Send Content to DP Group from Monitoring Node in ConfigMgr 2012 SP1

This post will demonstrate how to create a right-click action on the Monitoring->Distribution Status->Content Status tab to send content to a DP group. Sometimes when troubleshooting an issue, I realize that the content was sent to one DP for testing, and then promoted to production. The out-of-box experience requires you navigate back to the object (package, software update, application, etc) and then send content to DPs. This right-click tool will save you several clicks.

sendtodpgroup

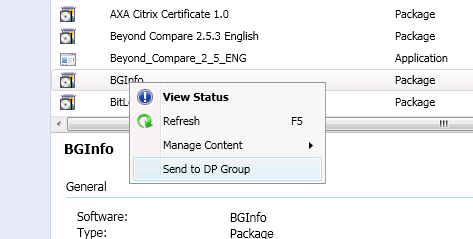
After selecting to “Send to DP Group”, you will see a PowerShell window with a prompt to choose the desired DP Group.

sendtodpgroup-2

Of course, you could create multiple right-click items with hard coded DP Groups and actions, but for this post, we’ll use the dynamic selector shown above.

You can download the .zip file and follow the directions in the included ‘info.txt’ file for a fast deployment to your admin console. You can review additional details below.

First you must create the proper r-click context menu. Copy the following .xml, save it as “SendToDPGroup.xml”, and copy it to C:\Program Files (x86)\Microsoft Configuration Manager\AdminConsole\XmlStorage\Extensions\Actions\14214306-59f0-46cf-b453-a649f2a249e1\SendToDPGroup.xml. (Adjust the path as appropriate to your ConfigMgr Admin Console installation path).

<ActionDescription DisplayName="Send to DP Group" MnemonicDisplayName="Send to DP Group" Description = "Send package to a DP group." RibbonDisplayType="TextAndSmallImage">
<ShowOn>
<string>ContextMenu</string>
<string>DefaultHomeTab</string>
</ShowOn>
<Executable>
<FilePath>PowerShell.exe</FilePath>
-ExecutionPolicy RemoteSigned -File C:\PowerShell\CM12RClickTools\SendToDPGroup.ps1 "##SUB:__Server##" "##SUB:__Namespace##" "##SUB:PackageID##" "##SUB:ObjectTypeID##" "##SUB:SoftwareName##"
</Executable>
</ActionDescription>

Notice in the .xml we specify the -ExeuctionPolicy RemoteSigned parameter. Best practice would be to sign your scripts, but if that’s not something you can manage easily, you can use the parameter as shown to modify the execution policy for the specific instance you’re launching, instead of changing the execution policy for all script execution. Next, copy the PowerShell code below, and save it to C:\PowerShell\CM12RClickTools\SendToDPGroup.ps1

#capturing arguments:
$SiteServer = $args[0]
$SiteNamespace = $args[1]
$SiteCode = ($args[1]).Substring(14)
$PackageID = $args[2]
$objectTypeID = $args[3]
$SoftwareName = $args[4]
$SiteDrive = $sitecode + ":"

"{0} {1} {2} {3} {4} {5}" -f $SiteServer, $SiteNamespace, $SiteCode, $PackageID, $objectTypeID, $SoftwareName

#Connect to PowerShell Provider:
$ModulePath = (($env:SMS_ADMIN_UI_PATH).Substring(0,$env:SMS_ADMIN_UI_PATH.Length-5)) + '\ConfigurationManager.psd1'
"Connecting to the Provider..."
import-module $modulePath -force
if ((get-psdrive $siteCode -erroraction SilentlyContinue | measure).Count -ne 1) {
new-psdrive -Name $siteCode -PSProvider "AdminUI.PS.Provider\CMSite" -Root $SiteServer
}
cd $siteDrive

"Gathering DP Group Names..."
$intcounter = 1
#Create a hashtable
$DPgroups = @{0 = "Name"}
$DPgroups.Remove(0)
Get-CMDistributionPointGroup | select Name | sort Name | % {
$DPgroups += @{$intcounter = $_.Name}
$intcounter++
}

#Choose the DP group
$dpgroups.GetEnumerator() | Sort-Object name
$DPgroup = read-host "Select a DP group, by number and press [enter]"
$DPGroupName = $DPgroups.get_item([int]$DPgroup)

switch ($objectTypeID)
{
#ObjectTypeIDs from SMS_ObjectContentInfo WMI Class
2 {Start-CMContentDistribution -PackageID $PackageID -DistributionPointGroupName $DPGroupName}
14 {Start-CMContentDistribution -OperatingSystemInstallerID $PackageID -DistributionPointGroupName $DPGroupName}
18 {Start-CMContentDistribution -OperatingSystemImageID $PackageID -DistributionPointGroupName $DPGroupName}
19 {Start-CMContentDistribution -BootImageID $PackageID -DistributionPointGroupName $DPGroupName}
21 {"SMS_DeviceSettingPackage - Nothing to distribute here"}
23 {Start-CMContentDistribution -DriverPackageID $PackageID -DistributionPointGroupName $DPGroupName}
24 {Start-CMContentDistribution -DeploymentPackageID $PackageID -DistributionPointGroupName $DPGroupName}
31 {Start-CMContentDistribution -ApplicationName $SoftwareName -DistributionPointGroupName $DPGroupName}
}

"DP Group Targeted distributed-Use the Monitoring node to monitor DP status."

Write-Host "Complete. Press any key to continue ..."
$x = $host.UI.RawUI.ReadKey("NoEcho,IncludeKeyDown")

Now re-launch your ConfigMgr Admin console to use the new r-click->Send to DP Group feature. As you can see from the code, we use Get-CMDistributionPointGroup to obtain all DP groups, and then create a hash table to allow us to display a simple selector. We then use Start-CMContentDistribution to send the content to the desired DP Group. Notice the required argument is based on the object type (package, application, updates deployment package, etc.), so we use a simple switch statement to determine the appropriate parameters to run.

Happy Scripting!

Greg
ramseyg@hotmail.com

How To: Promote an Application Simulation to a Required Deployment in ConfigMgr 2012 SP1

A simulated deployment is a great way to validate detection rules and deployment types prior to deploying an application. In my opinion, there’s one small task that’s missing – the ability to promote a simulation to production.

This post will demonstrate how to create a right-click action on the Monitoring->Deployments tab to promote a simulation to a required deployment.

promotesimulation

Selecting the action “Promote Simulation to Production” will launch PowerShell and display the simulation information (numbertargeted, numbersuccess, numbererrors, etc):

promotesimulation-2

You can also see that by default, the script is configured to create a deadline for 8:00 PM of the date in which the script is run. Be sure to modify the script to fit your needs (as well as avoid surprises).

You can download the .zip file and follow the directions in the included ‘info.txt’ file for a fast deployment to your admin console. You can view additional details below.

First you must create the proper r-click context menu. Copy the following .xml, save it as “PromoteSIMToProd.xml”, and copy it to C:\Program Files (x86)\Microsoft Configuration Manager\AdminConsole\XmlStorage\Extensions\Actions\d1621955-48ad-4bba-9c85-95f74c0c6538\PromoteSIMtoProd.xml. (Adjust the path as appropriate to your ConfigMgr Admin Console installation path).

<ActionDescription DisplayName="Promote Simulation to Production" MnemonicDisplayName="Promote Simulation to Production" Description = "Removes Simulation and Creates Mandatory Deployment based on Simulation Config" RibbonDisplayType="TextAndSmallImage">
<ShowOn>
<string>ContextMenu</string>
<string>DefaultHomeTab</string>
</ShowOn>
<Executable>
<FilePath>PowerShell.exe</FilePath>
-ExecutionPolicy RemoteSigned -File C:\PowerShell\CM12RClickTools\PromoteSIMToProd.ps1 "##SUB:DeploymentID##" "##SUB:__Server##" "##SUB:__Namespace##" "##SUB:CollectionID##"
</Executable>
</ActionDescription>

Notice in the .xml that we specify the -ExeuctionPolicy RemoteSigned parameter. Best practice would be to sign your scripts, but if that’s not something you can manage easily, you can use the parameter as shown to modify the execution policy for the specific instance you’re launching, instead of changing the execution policy for all script execution. Next, copy the PowerShell code below, and save it to C:\PowerShell\CM12RClickTools\PromoteSIMToProd.ps1

#capturing arguments:
$DeploymentID = $args[0]
$SiteServer = $args[1]
$SiteNamespace = $args[2]
$SiteCode = ($args[2]).Substring(14)
$CollectionID = $args[3]
$SiteDrive = $sitecode + ":"

#"{0}, {1}, {2}, {3}, {4}, {5}" -f $DeploymentID, $SiteServer, $SiteNamespace, $CollectionID, $Sitecode, $siteDrive

#setting a hard avail time and deadline of 20:00 on the same day the script is run.
##$availDate = read-host "Enter deadline date (e.g., 12/02/1973)"
#$availableTime = read-host "Enter deadline Time (e.g., 18:00 for 6:00pm)"
$availDate = (get-date).toshortdatestring()
$availtime = "20:00"  # if you want to configure for current time, (use get-date -format H:mm)
$deadlineDate = (get-date).toshortdatestring() #to specify a time in the future, just enter a date string like "12/02/2023" (with quotes)
$deadlineTime = "20:00"

"Querying Simulation Information..."
#Connect to PowerShell Provider:
$ModulePath = $Env:SMS_ADMIN_UI_PATH.Replace(„\bin\i386“,“\bin\ConfigurationManager.psd1“)

import-module $modulePath -force
if ((get-psdrive $siteCode -erroraction SilentlyContinue | measure).Count -ne 1) {
new-psdrive -Name $siteCode -PSProvider "AdminUI.PS.Provider\CMSite" -Root $SiteServer
}
cd $siteDrive

#"{0},{1}" -f $Coll.name.tostring(), $Coll.membercount.Tostring()

"Get Simulation Deployment Info"
$simDeploy = get-cmdeployment -deploymentid $DeploymentID
if ($simDeploy.DeploymentIntent -ne 3) {
"`nOnly Simulations can be Promoted to active deployments!`n"
Write-Host "Press any key to continue ..."
$x = $host.UI.RawUI.ReadKey("NoEcho,IncludeKeyDown")
break
}
$simDeploy

#Get Collection info, so we can show potential number of systems impacted
#    (for some reason, get-cmdevicecollection wasn't dispalying membercount consistently through script)
$Filter = "CollectionID='$CollectionID'"
$Coll = gwmi sms_collection -Namespace $SiteNamespace -ComputerName $SiteServer -filter $filter

#Display info to admin before proceeding.
"`nAvailable: {0}, {1}" -f $availdate, $availtime
"Deadline: {0}, {1}" -f $deadlineDate, $deadlineTime
"Collection: {0}" -f $Coll.Name
"Total Collection members: {0}" -f $Coll.membercount

#Prompt user to verify available and deadline times, and to confirm required deployment
$x = read-host ("Press [CTRL+C] to exit, or Press any key to create the required deployment ...")

"Promoting Simulation to Production..."

"Removing Simulation..."
remove-cmdeployment -ApplicationName $SimDeploy.SoftwareName -DeploymentID $simDeploy.DeploymentID -force
"Creating new Application Deployment"
Start-CMApplicationDeployment -CollectionName $simDeploy.CollectionName -Name $SimDeploy.SoftwareName  -AvaliableDate $availDate -AvaliableTime $availTime -Comment "Simulation Promoted to Production by $env:Username" -DeadlineDate $deadlineDate -DeadlineTime $deadlineTime -DeployAction Install -DeployPurpose Required -EnableMomAlert $True -PreDeploy $True -RaiseMomAlertsOnFailure $True -UserNotification DisplaySoftwareCenterOnly

Write-Host "Complete. Press any key to continue ..."

$x = $host.UI.RawUI.ReadKey("NoEcho,IncludeKeyDown")

Now re-launch your ConfigMgr Admin console to use the new r-click->Promote Simulation to Production feature. As you can see from the code, we use Get-CMDeployment to obtain the details of the simulation – and we verify it’s a simulation by DeploymentIntent=3. We then perform a WMI query to get information on the targeted collection, so that we can show the admin the total collection member count. After prompting the admin to continue, we simply call Remove-CMDeployment to remove the simulation, and then use the information previously queried and call Start-CMApplicationDeployment to deploy the application. Include additional parameters for Start-CMApplicationDeployment to standardize the deployments for your environment. For example, you could add -RaiseMomAlertsOnFailure $True -OverrideServiceWindow $True to the command line.

So as you can see, this could be a huge opportunity to ensure a consistent, automated process for application deployment.

Happy Scripting!

Greg
ramseyg@hotmail.com