Updating ServiceNow with Hardware Asset Data using Logic Apps
April 27, 2020 1 Comment
This is part 4 of the scenario Perform Automation Based on Device Enrollment in Microsoft Intune.
This article describes how to modify the previous step so that instead of sending an email, we create or update an asset record in ServiceNow.

Figure 1 is a simple representation, but there are actually several steps behind the scenes to make this work. Figure 2 provides a more in-depth description of the remaining work to complete this scenario.

As you can see from Figure 2, we have to perform some extra queries to understand which actions are appropriate. Also, the asset model is a required field when creating an asset, so we need to either query to get an existing model ID, or if no matching model is found, we must create a new Model. Once we know we have a model, we then create an asset and link it to the model.
The process of creating an asset also creates a CMDB record by default, with limited information. So in all cases, we will update the CMDB record with additional information.
Depending on your company’s expertise in Logic Apps vs. ServiceNow, you could perform all of these steps in ServiceNow as well. For this article, we will build it all in Logic Apps. Figure 3 shows the query to ServiceNow, and if the device already exists, update CMDB.

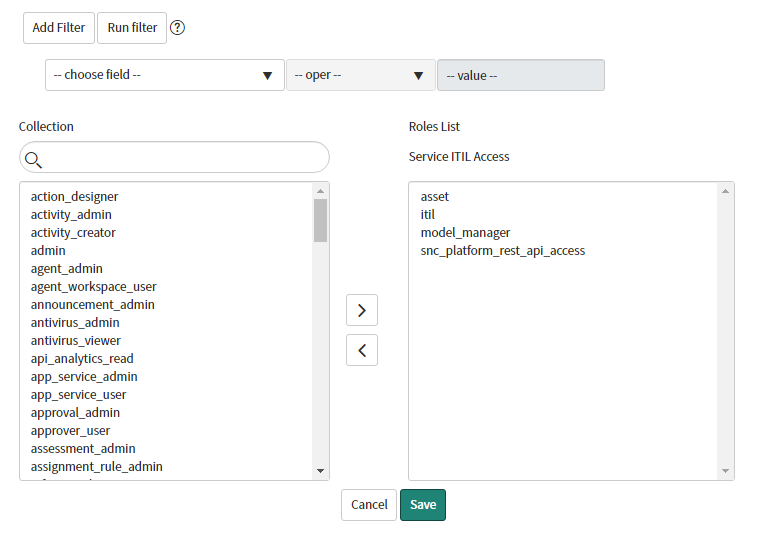
Before building out the remainder of this flow, ensure you have a ServiceNow developer instance with a configured service account. Figure 7 in that article shows the service account and the delegated rights. Since this article will create models and assets, you must also add the roles named asset and model_manager, as shown in Figure.4
Building out the rest of the flow
Start by cloning your current DeviceEnrollment Logic App so that you have a backup, and then in your DeviceEnrollment Logic App, remove the send email step we created in the previous article.
List Records with Matching SerialNumber
First, we must query ServiceNow to see if this device already exists in the hardware asset table, and then we build a condition to take us down the right path for subsequent steps.
- Add a new action, choose ServiceNow, and then List Records.
- If this is the first time connecting to ServiceNow, you will be prompted to connect. Enter the service account and password that we created in How to: Obtain a ServiceNow Developer Instance and Configure API Integration.
- For Record Type, choose Hardware.
- For Query, note that you will be using the query language from ServiceNow. For this step, you will enter serial_number= and then insert the dynamic variable for SerialNumber, as shown in Figure 5.
- Verify the information in Figure 5.

- Add a new action called Condition.
- For the Condition, we must count the number of records returned from the previous step in Figure 5. Click on the condition filter field, and click on Expression in the pop-up. Enter the following expression:
length(body(‘List_Records_with_matching_SerialNumber’)?[‘result’])
- If, by chance, you named the previous step for listing records from ServiceNow differently, be sure to update that expression.
- Verify the information as shown in Figure 6 and then select Update.

- After selecting Update, you should see the conditional step with a branch for true and false, as shown in Figure 7.

Update Existing Record in CMDB
We have confirmed we have an asset, and for this article, we’re going to assume that all asset information is set correctly (I’ll follow up with another article that will give other considerations depending on your environment).
As mentioned previously, the Asset and CMDB records are paired together in ServiceNow-they are different records with their own attributes. However, by default, there are business rules in place so that when you touch one, you may impact the other.
Since we have machine fact information from Intune, let’s use that information to keep the CMDB accurate.
What is a machine fact? Machine fact is gold! It is data that humans haven’t touched, and haven’t had an opportunity to touch or make dirty. For example, when you query the win32_operatingsystem WMI class, you receive operating system details from the Windows system that are detected by the operating system (things like memory, operating system version, last bootup time, and more). These machine facts are your best source of information for use in reporting, asset management, and configuration management.
- Add a new action, choose ServiceNow, and then Update Record.
- Choose Record Type of Computer (this ties to the appropriate CMDB class).
- For System ID, choose the dynamic variable Configuration Item, which was obtained from the List Records with matching SerialNumber step.
- Since this data is coming from Intune, you can set the Discovery source as Intune (note that Intune is not a default option in ServiceNow – work with your ServiceNow team to add this option or choose an available value, such as Other Automated).
- Set other desired variables, as shown in Figure 8. For my example, I’m mapping the AzureADdeviceID to the CMDB attribute Object ID, as this will help with future scenarios for correlation, uniqueness, etc. I also use the Intune property lastSyncDateTime for the CMDB attribute Most recent discovery, which helps understand the activity of a device and can help with asset management. Also, as shown in Figure 8, you can see that Logic Apps automatically identified this as a potential array (although for the way we built this, you will always have an array of size one by the time you get to this point).

Creating a New Asset in ServiceNow
And now, to follow the conditional check for an existing record down the false branch. This process is a little more involved, as shown previously in Figure 2.
When creating a new asset in ServiceNow, you must specify a model for that asset. The Model table is a relational table to the asset, so if the model does not yet exist, you need to create the model first, or asset creation will fail. Figure 9 shows an overview of creating a new asset. First, we check if the model exists, and if not, create the model followed by the asset, and then update CMDB (you can think of them as dependencies for now – Model->Asset->CMDB configuration item).

As we have walked through these steps a few times, the next few items will be abbreviated and show you the highlights of each action, without walking you through the details.
First, we must check if a model exists. We do this by querying the ServiceNow Hardware Model class. Notice this time I set Display System References to Yes. This will give me a human-friendly model name that I can use to compare against the model I received from Intune, instead of a model identifier that’s unique to ServiceNow. So build your query as shown in Figure 10 to query for name=<your dynamic variable for model>. And similar to our conditional for checking for an existing device by serial number, create a new conditional here with the following expression:
length(body(‘List_Records_-_see_if_Model_exists’)?[‘result’])
If, by chance, you named the previous step for listing models from ServiceNow differently, be sure to update that expression. Figure 10 shows the query and the conditional.

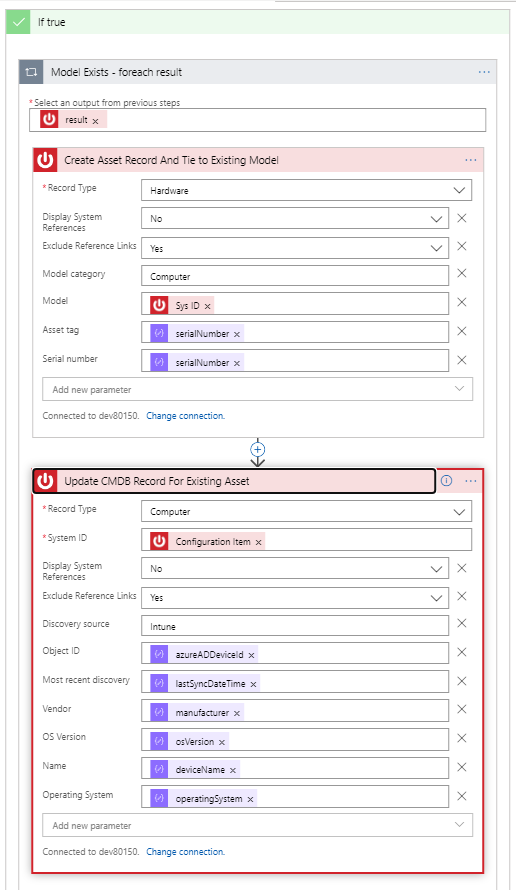
If the model exists, we follow the true branch and create an asset, followed by updating the (newly-created) CMDB configuration item, as shown in Figure 11. Notice the Create Asset action below uses the Create Record ServiceNow action, and the Update CMDB action uses the Update Record ServiceNow action. Notice for Model we pass the Sys ID, which is a unique identifier in ServiceNow for the model obtained from our model query step.
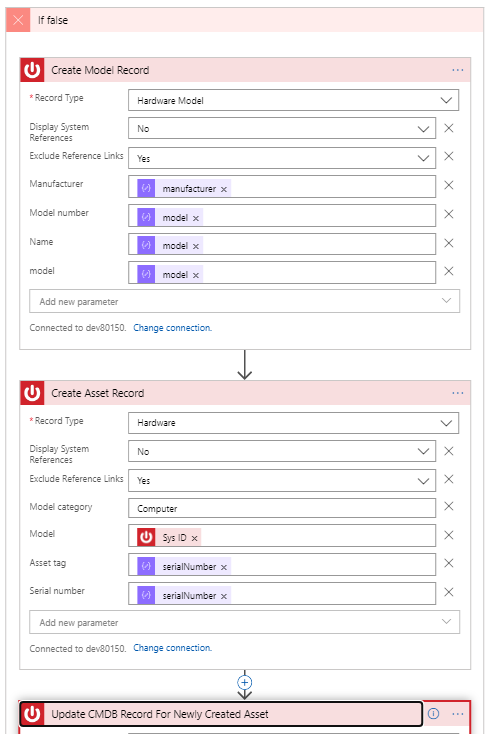
If our conditional check for model returns that the model does not exist, we must create the model first. Figure 12 shows the high-level steps and classes involved in creating the model. We then take the Sys ID from the Create Model Record step and use it when creating the asset record. Finally, we update the CMDB record for the newly-created asset (details are not shown below but are the same as the last step in Figure 11).
Congrats! You now have an example Logic App for processing information from Intune and inserting it into ServiceNow! As mentioned, this is one way to achieve this task. ServiceNow provides multiple ways to integrate via API, but this is a great starting point with using Logic Apps.
If you missed it, check out the initial article for this scenario to see all the steps from beginning to end. I also posted sample templates in GitHub.
Happy Automating!
Greg
P.S. A big Thank You! to Donnie Taylor for helping me troubleshoot some of the pain around Logic Apps and the ‘standard’ alert coming out of Log Analytics – hopefully Logic Apps will build some magic to easily consume that payload in the future.
P.P.S. Also a big Thank You! to Greg Nottage for running through my draft article and providing feedback for how to make it more usable.